
DIY Couple’s Collage Shadow Box

First & Foremost, What is it?
I’ve created a completely custom collage of me, George, Riley & Benji in a Shadow Box!
Stores Used:
- Michael’s
- Walmart
- A Hoke Limited (Trade Showroom I work at)
What You’ll Need:
- I got a 16″ x 20″ shadow box from Michael’s for about $20, it was a buy one get one 1/2 off. I’ll warn you ahead of time that the allotted space isn’t 16″ x 20″, the entire box including the frame is 16″ x 20″
- Fabric Samples or Colored Paper (if your collage doesn’t take up the full space)
- 3D wood letters from Michael’s (about $1-2 each)
- Painters Tape, A Heart Hole Puncher & Glitter for the big ‘&’
- Foam Core (Walmart next to the poster board, about $1) & X-Acto Knife
- Photo Printer, Paper & Scissors
Steps:
- Measure the inside of your shadow box, and cut (carefully with your X-Acto Blade next to a ruler or straight edge so you get a straight cut) your foam core a couple centimeters shorter on the top and right side so that it’s a tight fit, or leave a couple inches on each side for colored paper or fabric samples.
- Arrange your letters how you want them to be shown and use a glue gun to fix them in place
- I then started taking strips of painters tape and punching out hearts and placing them in random places on the & and used Elmer’s glue with pink glitter to create random pink hearts. If you do this step, ensure you take the tape off slowly & carefully while the glue is still wet, otherwise the entire heart will peel off.
- Start printing out the pictures that you want to use and begin arranging them on the foam core, and once you have the placement figured out glue them down or use double sided sticky tape, its up to you.
- Once you have your collage all glued/taped down to the foam core, you can start gluing down your letter arrangement, i used super glue for this part; I wanted to ensure it stayed, and I didn’t want to deal with the long strings that come with using a glue gun.
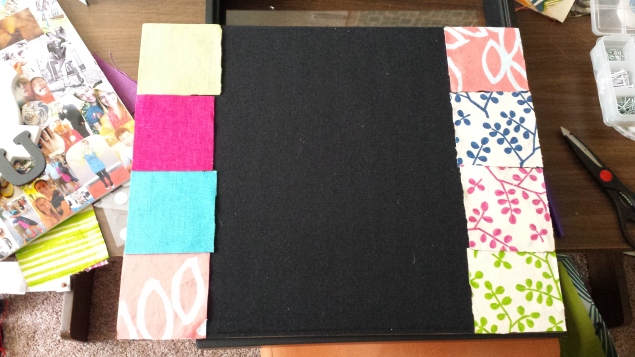
Showing my arrangement of fabric samples on shadow box backing
- Lastly, if you decided to use fabric samples or wallpaper, etc., then the next step is arranging them and gluing those down to the backing of the shadow box. I arranged mine based on the colors found in the photos around the border. Be careful when selecting the glue, its trial and error unless you’ve done it before. I first used super glue, but since the fabric samples are so thin, and the backing is made of a felt material, it didn’t work out that well and you could completely see the glue. So I switched to super glue, and it worked out better, I would recommend fabric glue, I am just lazy and didn’t want to go buy it.
- And that’s it! If you’re happy with your design, put it all together and go show it off!!
Time it Took:
- It took about 3 hours, obviously the next time I make oneit’ll be much easier.
- Measurements are key, I didn’t measure the first time, I assumed it was 16 x 20 and was wrong.
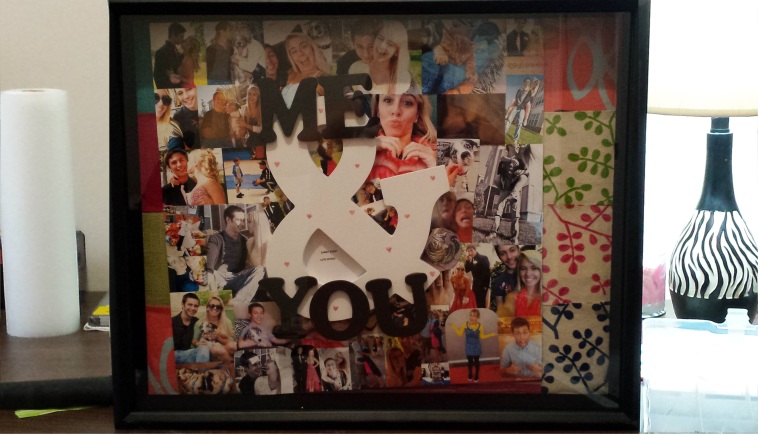
My Shadow Box is Complete!
